
I’ve always loved baked eggs. When I was little, we often had typical French baked eggs which consisted of eggs cracked into a ramekin, topped with a little whipping cream, chopped fresh chives, a good pinch of fleur de sel and freshly cracked pepper and then baked until the whites are just set and the yolk is still oozy. I love it. For brunch, for lunch or for dinner it’s so incredibly versatile and really satisfying each and every time. It also happens to be a vegetarian meal, so I love to entertain with it if we have vegetarian friends over.
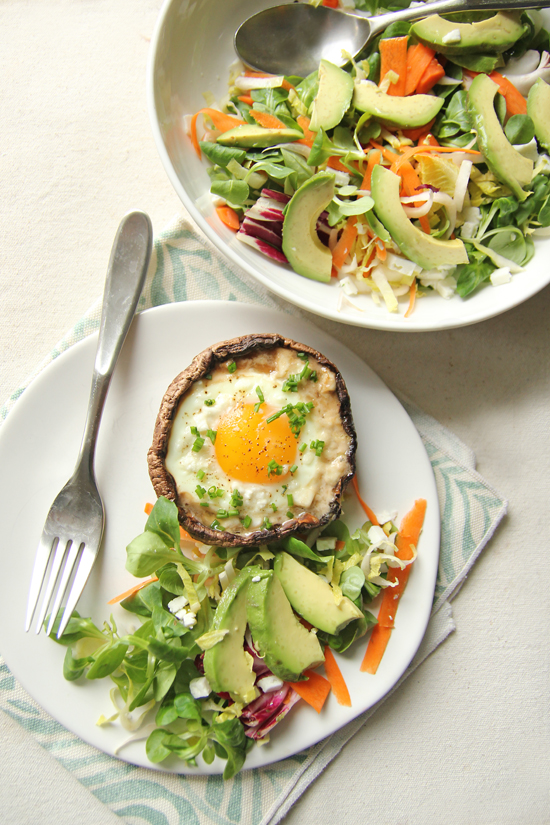
This version uses large portobello mushrooms, that are first baked until tender, and to which is added a cracked egg. It does take a little checking up on (not all eggs will necessarily be ready at the same time since they might vary somewhat in size and because the portobellos will as well) but it’s one of my new favourite ways to enjoy baked eggs. If you’re anything like me, you bore easy. I need variety when it comes to what I choose to put on my plate each and every week, and this is a new favourite I still can’t get enough of. The only requirement is to have very large portobello mushrooms — the bigger the better! If they aren’t, you’ll have trouble cracking the eggs in without making a mess.
I like to serve this with an everything-but-the-kitchen sink salad — a great way to use up odd bits and pieces of veggies and cheese I have lying in my fridge. This time it was shredded carrots, avocado, cubed feta cheese and different varieties of lettuce.
Parmesan and Portobello Baked Eggs
Serves 2
2 very large portobello mushrooms
1/2 tsp finely chopped thyme
1/4 cup grated Parmesan cheese (and more for the table)
Salt and freshly ground black pepper
2 eggs
2 tsp chopped fresh chives.
Trim the very tip of the mushroom caps, if needed, so the portobello mushroom stand as straight as possible. Using a spoon, remove the gills and gently scoop out a little bit of the flesh so you have a deep enough surface to work with. Arrange the mushrooms, stem-side up, on a greased aluminum-lined rimmed baking sheet. Bake in 450 °F (230 °C) oven until browned and tender, 15 to 18 minutes. Using tongs, tip the mushrooms to discard any liquid and pat dry with paper towels. Sprinkle each with half of the Parmesan cheese, half of the thyme and a good pinch of salt and pepper
Reduce the heat of your oven to 375ºF (190ºC). Crack an egg into each mushroom and carefully place into the oven; bake until the egg yolks are set and the egg whites are no longer runny, 15 to 20 minutes. Sprinkle with chives and serve with extra Parmesan cheese at the table, for sprinkling, Enjoy!
Kristi @ Inspiration Kitchen
March 30, 2014 at 10:16 am (10 years ago)This looks so good – and healthy! I love it!
jennifer
April 1, 2014 at 9:14 pm (10 years ago)It’s definitely one of those delicious dishes that just happens to be healthy!
Simone
March 31, 2014 at 12:39 am (10 years ago)Great idea to break an egg in the portobello!! And it looks great too with the fresh salad to go with it!
jennifer
April 20, 2014 at 5:18 pm (10 years ago)Thanks Simone!
Ruby @ The Ruby Red Apron
March 31, 2014 at 9:10 pm (10 years ago)What a lovely brunch idea! I love oozy yolks! The salad is such a clever thing to do as well. I always have odds and ends lying around in the refrigerator!
jennifer
April 1, 2014 at 9:14 pm (10 years ago)Same here — and it’s such a great way to make sure food doesn’t go to waste!
Bam's Kitchen
April 1, 2014 at 6:28 am (10 years ago)Fun idea! A great brunch idea and with the light salad on the side a perfect way to celebrate spring.
jennifer
April 1, 2014 at 9:12 pm (10 years ago)It’s definitely a great idea for brunch as well!
Cailee
April 1, 2014 at 11:59 am (10 years ago)This looks delicious!! LOVE your blog btw!! Your photography is so beautiful! Hope that you have a great rest of your day!!
jennifer
April 1, 2014 at 9:13 pm (10 years ago)Thank you Cailee!
Kelsie
April 5, 2014 at 10:00 pm (10 years ago)This is the second time I’ve made baked eggs. The first time didn’t go so well so I thought I’d try again with this because it looks so good! But alas, our eggs didn’t cook even after 20 minutes, but had a hard rubbery top. Is there something I’m doing wrong? Or is there a way to speed the cooking of the inside of the eggs without the top getting that thick coating?
We have a gas oven but I wouldn’t think that would make a difference…
jennifer
April 6, 2014 at 7:04 pm (10 years ago)Hi Kelsie,
Baked eggs can sometimes be a little tricky — and it does take a little playing around to take them out at the right time! If the tops were rubbery and already cooked before the whites were, I would suggest loosely covering the eggs with some aluminum foil once the tops start to look like they’re cooking too fast so that the eggs can continue to bake without the top of the yolks overcooking and getting that unpleasant hard top.
Also, were you using extra large eggs? I would suggest not using anything larger than large eggs when making baked eggs or there is just too much egg to work with (especially if you’re baking them inside portobello mushrooms). Finally, I would suggest checking the temperature of your oven using an oven thermometer. Ovens are not always accurate which may explain why the whites weren’t cooked all the way after 20 minutes.
I hope you try them again — baked eggs can be a little tricky, but they’re so worth it once you get them perfectly cooked! Let me know how it goes!
Julie @ This Gal Cooks
April 23, 2014 at 11:07 pm (10 years ago)What a great idea for baked eggs. I never thought to put them in portabellos but now I’ll be sure to pick up some portabellos the next time at the store so I can try this. Great recipe, Jennifer!
Cailee
April 24, 2014 at 11:04 am (10 years ago)Wow!! This looks delicious! So healthy and nourishing!! I love how you added avocado 🙂 YUM!
tanya
May 8, 2014 at 10:39 pm (10 years ago)This is one of those recipes that I’ll be thinking about for days! So wonderful!!